Throne of Everblight Conversion: The Horror

Original upload date: July 26 2015

It’s done! Despite the setbacks and losing my enthusiasm for this conversion, I finally finished my converted Throne of Everblight:

Throne of Everblight Conversion

I originally nicknamed it “The Monster” but hubby has talked me into renaming it “The Horror” as a nod to Lovecraft’s “The Dunwich Horror” (since the beastie bears a resemblance to Yog-Sothoth). One of the reasons that the conversion has taken so long is that I designed it as a series of micro-assemblies to make painting easier. This means that I constantly needed to make sure that the parts were aligned.

Throne of Everblight Conversion

I received a lot of love for this conversion on the forums and on the Legion of Everblight facebook page. It was even mentioned on the Blight Makes Right podcast. It really inspires to me continue attempting these sorts of ambitious projects, so thank you!

Thanks for reading, likes/shares/comments are appreciated!

Throne of Everblight Conversion: The Tentacles

Original upload date: January 7 2014 – May 16 2015

I chose this tentacle as the base anchor for the portal as it has a small flat section that fits onto the platform the best. I started by sawing off the end of the tentacle. It widens to socket into the beast’s body but I wanted to lengthen and change the angle to have it emerging from the pool above. I then hollowed out the top section so that I could have an increased surface area to attach the new top half of the tentacle. I drilled out a deep pin hole to support the upper tentacle and platform. This time I used a hollow brass rod to minimise weight.

Throne of Everblight Conversion

I want to assemble the model in three sub-assemblies to make it easier to paint, and that means I need this tentacle connection to remain separate until the painting is done. I made a plug of putty as my starting point for the upper tentacle. I liberally applied vaseline to the socket so that the putty plug will be a perfect fit, but not stick.

Throne of Everblight Conversion

I decided to wrap a tentacle around the platform for cool factor. I started by forming the basic shape out of aluminium foil. I use al foil as an armature as it is lighter and cheaper than putty, but it is not load-bearing so I needed to pin the claw through the putty into the platform.

Throne of Everblight Conversion

I then sculpted putty over the top of the foil, joining it up with the original claw.

Throne of Everblight Conversion

I realised at this point how long this conversion was going to take me. I could only sculpt a couple of scales at a time (or risk smudging) and I had about a hundred to go! Ugh.

Throne of Everblight Conversion

I started to thicken up the support tentacle and add scales. It was important to match up the thickness so that it blends together when it’s all joined up to the portal, but for now I wanted to keep the pieces separate so that I could paint underneath the portal more easily. It’s taking a long time because I keep messing it up the thickness and the scales.

Throne of Everblight Conversion

The two side tentacles are done. I had to saw off the ends as they thickened to fit into the Throne’s sockets. I want to make it look like the body of the beast is much higher on the other side of the portal, so the thickness of the tentacles needed to be more uniform. For that reason I filled in some of the musculature at the top of the tentacle as well. Some of the tentacles had a flattened section to rest on the base, because mine will be in mid-air I needed to fill out those flattened sections.

Throne of Everblight Conversion

Here’s the top half of the wrapping tentacle. I learned a lot from my mistakes with the first one so I got the shape completely done before I started the scales.

Throne of Everblight Conversion

As opposed to this one, which I was very unhappy with. I lost count now of how many times I sliced greenstuff off and started again. It’s vertical so that it can support the weight of the structure but it just doesn’t look right.

Throne of Everblight Conversion

So, after stripping it and resculpting several times I decided to start over and curled the putty around the brass rod. I think it’s an improvement but I wasted several months of sculpting those damn scales! That’s the new one on the left.

Throne of Everblight Conversion

Here it is connected to the resin tentacle.

Throne of Everblight Conversion

This conversion has taken me a very long time. I experienced delays when my putty never arrived. I tried a different putty and it turnout so badly that I had to rip it all off and start again. I also had to start the first tentacle from scratch. All together it took the fun out of the project and so I was dragging my heels on the conversion. (Don’t worry, it’s finally finished now!)

Thanks for reading, likes/shares/comments are appreciated!

Throne of Everblight Conversion: The Portal

Original upload date: October 20 2013

I was playing around with the portal. I decided to texture the top first as it would be more difficult once the tentacles are attached. I hunted around for a picture of a whirlpool and came up with this image to use as a guide:

zpnoy08l

I started applying putty to the top but then had a better idea. Vallejo Water Effects is awesome, it has the consistency of moisturising cream. You spread it across your surface and it dries clear. I decided to make a core shape out of the water effects and paint it up in blues. Then I’ll add a layer of water effects on top mixed with blue so it will be translucent. Finally I’ll add another layer on the very tips and paint it white like froth. This means that most of the whirlpool shape will be added as a later stage after I have assembled and painted the model. Here’s a pic of the water effects just after it was applied (sorry for the night-time shot).

Throne of Everblight Conversion

I originally planned to open up the middle (hence the hole) and have the whirlpool forming a cone shape, but I abandoned that idea. It was tricky to tell how it looked when it was clear so I gave it a dusting of white spray. I’m happy with how it turned out. Once it’s painted I’ll be bulking the waves out to about double their current size, but it’s an organic process. I’m mostly making it up as I go!

Throne of Everblight Conversion

Thanks for reading, likes/shares/comments are appreciated!

Throne of Everblight Conversion: Sorceress and Platform

Original upload date: October 2 2013

I felt as though the original Sorceress pose was too passive. I used a succubus arm to make it look like she is beckoning the horror down. (I bought a sprue of succy arms the last time my club did a PP order. I think these are a great investment for converting Legion, as hands are especially difficult to sculpt).

Throne of Everblight Conversion

The original throne has claws coming through the top. Since my platform is no longer part-beast I did not add these claws and instead obscured their holes. I then cut the tip off the claws, orientated them upward and stuck them on the corners of the platform. This is to help make my platform look different to the original and fit more closely to my art concept. In his picture I’m in the process of sculpting little bands around the ends of the spikes.

Throne of Everblight Conversion

Thanks for reading, likes/shares/comments are appreciated!

Throne of Everblight Conversion: The Base

Original upload date: September 26 2013 – October 16 2013

I needed to build the conversion from the ground up, so I started with the base. I started by scouring my native hardware/craft stores for cracking paint to match my desert bases. The idea with this stuff if that as it dries it pulls against the previous paint layers, leaving cool cracks in the surface.

After painting a base colour (for the medium to “pull” against) I spread this stuff on thick. The thicker the layer the deeper the cracks.

Throne of Everblight Conversion

After a couple of days drying it looked like this:

Throne of Everblight Conversion

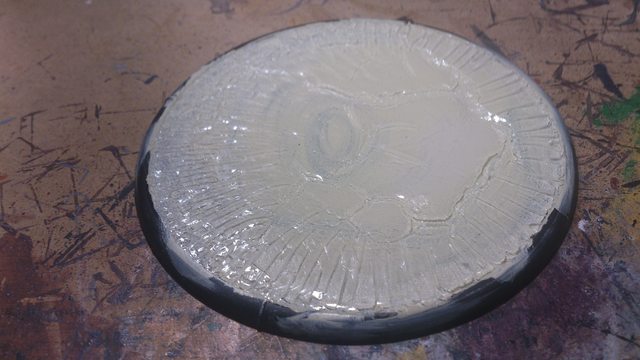
It’s a cool effect, but not the one I was going for. The cracks are all along the outside pointing to the middle and they are cracking into uniform square shapes. This doesn’t match my army at all! I do like the effect, and I’ll keep it in mind if I ever do ice bases.

So back to the drawing board… After a lot of pondering I realise that the natural desert effect is caused by wet clay cracking in the desert sun. So I can try to emulate the effect with my own wet clay. I grab some clay and water and begin to whisk it together into a gluggy soup. It didn’t work very well, I’m not very good at whipping cream, let alone clay! So I did what any sane, rational person would do… and put it in the blender. (Make sure you wash your kitchen appliance thoroughly if you do not wish to end up with a bad case of spousal remorse).

So I poured the clay soup into my base and set it in the sun. It was a lovely 31°C (88°F) Spring day in Sydney so I hoped to get the cracking effect I was after.

Throne of Everblight Conversion

Bummer. Another cool looking effect, but not the one I was after. I decided to try again and begin ripping the clay off the base. It came off in lovely thin chunks and this gave me an idea. I began to glue the chunks back on the base in a random pattern.

Throne of Everblight Conversion

I needed a brass rod to pin the floating disk to the base. It needed to be study as I did not want any pressure from above to bend the wire. Not to worry though, it took the hubby’s entire body weight to bend it to the angle shown. Thanks hubby.

Throne of Everblight Conversion

The bend gives it a greater surface area for the glue, increasing the hold. To make it extra secure I added pins around the brass rod so that it can’t wiggle from side to side and finally some greenstuff to lock it in tight. I was SO happy to see that the platform piece came separate as I was worried I would have to do some severe sawing. I covered up the sockets on the underside of the platform.

Throne of Everblight Conversion

I was having trouble sculpting a rock for the base. I tried clay and greenstuff but I couldn’t get it working right. Cork and bark are great suggestions but I didn’t have any on hand, I did however find something else buried deep in my scenery box.

Rocks! I mean, what better to use as a rock? Right? I used to use shale in scenery projects because it is available where I live, it can be broken into the right size with your bare fingers and it paints up nice. I stopped using the shale a few years ago because it’s quite heavy, but that could actually be a boon for my current project. I glued some shale around the brass rod and filled up the gaps with putty and clay. I also added some bones and other details to the base. I quite like how it turned out!

Throne of Everblight Conversion

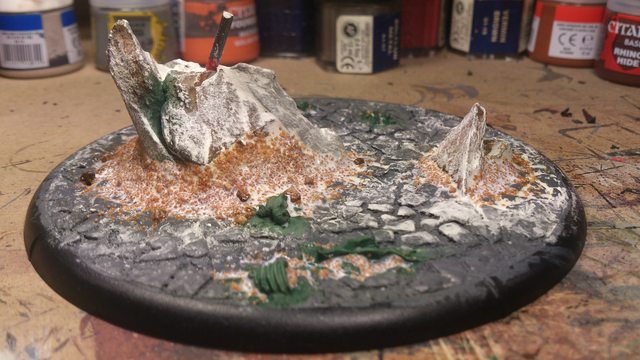
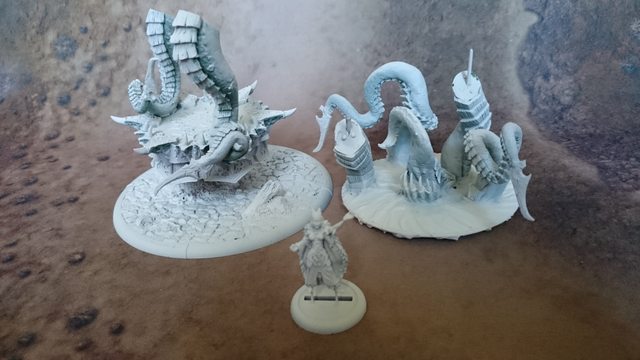
I stuck the platform in position. I also cut a circle of thick plasticard to use as my portal. I had a little internal debate on how large to make the portal. On the one hand, a large portal would look more impressive, but it would be nice to fit it in my army box. I also don’t want it to be too top heavy, because all of the weight will be resting on a tiny point. I’ll have to start conservative and enlarge it if needed.

Throne of Everblight Conversion

Thanks for reading, likes/shares/comments are appreciated!

Throne of Everblight Conversion: Planning

Original upload date: September 24 2013

It was at this point that I started planning my most ambitious project to date.

zfeyhrgl

I heard other Legion players talking about how good The Throne is with my (at the time) favourite Warlock, Thagrosh, but I really didn’t like the original model. So during my design stage I made a tally of all the things that I like about the model and the things I hate while keeping in mind Privateer Press’s converting restrictions (must retain weapons, no other manufacturers, etc) and came up with this:

Tentacles: They have to stay as they are the beast’s main weapons.
Sorceress: She’s fine.
Toothy Maw: Gross, but it suits the monster.
Metal Platform: Looks wicked cool.
Weird Tower Shape: Why is it so tall? I don’t like his tubular look.
Icky Brain Matter: Blargh. I don’t like the fleshy folds.

So I wanted a way to get rid of the tall shape and fleshy folds while retaining the tentacles, maw, platform and sorceress. I then realised that one of the reasons that I love the sorceress on the platform is that it reminds me of this:

uqiqgr7l

It’s a Magus from the Warhammer Online game that I tried out years ago, modelled after GW’s Disc of Tzeentch. I love the Spellcaster on hovering disc look, so that’s the direction I decided to take. Now as for the beastie itself, the maw surrounded by tentacles reminds me of this:

w1bxboyl

It’s the Watcher in the Water from the Lord of the Rings. I like the idea of the maw emerging from a pool surrounded by the tentacles. But how will I put these two together? I could have the beast coming out of a pool in the ground while the sorceress floats overhead, but it may look like it’s reaching up to attack her. Then I had another idea:

l8ahfbbl

This is from another game, RIFT, that I tried out when it went free-to-play. I love the idea of a portal opening up overhead and tentacles of an eldritch abomination reaching down…

So my first draft was: “The sorceress will be standing on the top of the Throne platform hovering above the base. Over her head will be a portal from which the tentacles and maw will be emerging downward. There are a couple of issues: the main one is that it will be top heavy so I will have to secure it very strongly to its base. Another is that I’m not sure yet what to make the portal out of. But anyway, that’s what I’m going to try, and no doubt the draft will be revised as I have further ideas.”

Thanks for reading, likes/shares/comments are appreciated!