Gatormen Posse Conversion

Original upload date: November 9 2013 – May 10 2015

I converted two of the Posse to avoid duplicates. I find that for units with large weapons, changing the angle of the weapon is enough to change the profile of the model. Here’s the first Gator with his arm closer to his body.

Gatormen Posse Conversion

For the second Gator I wanted to try something similar to my earlier Spawning Vessel Acolyte conversion. I cut the arm off and extended the weapon haft, rotating the angle so that the weapon rested on the base. I needed something to go into his other hand but I didn’t want to do another weapon. So I went through my bits box and found the leftover Incubi body I had from my last conversion. His face was suitably tortured in appearance, so I cut off the head and pinned it to the Gator’s fist. I rotated the arm and resculpted the elbow, then I added hair coming from the fist and over the top. I’m quite happy with how he looks.

Gatormen Posse Conversion

I ruined the ear while sawing the head off, so I had to give him a new one. All better! I decided to paint it up in the same colours as my Nyss, as a reminder to their employers that the Gators are not to be trifled with.

Gatormen Posse Conversion

And here they are painted up. I wanted to make them look grubbier than my Legion, so I drybrushed and washed the scales and stippled their weapons. I used the same colours as my Legion beasts but in a different way. They should hopefully tie into my army, while still looking separate from it.

Gatormen Posse

They have so many feathers, teeth and other goodies adorning them. I took the opportunity to add a bright, contrasting spot colour to the unit.

Gatormen Posse

I’m quite happy with how their eyes turned out.

Gatormen Posse Conversion

Gatormen Posse

I like playing with the Gatormen so much that I eventually got a second set. I’m not sure whether I prefer the new or older sculpts.

Gatormen Posse

Thanks for reading, likes/shares/comments are appreciated!

How to Paint Faces: Annyssa Ryvaal

Original upload date: November 3 2013

I was asked on the forums to explain how I paint my faces so I wrote a little guide:

Aella’s Guide to Painting Faces

Step 1: Clean and assemble your model as normal. I prime my Legion in white because of the pale flesh. When I paint darker/dirtier models, I prime in black.

Step 2: You can either start with a dark basecoat and highlight lighter, or start with a mid-tone and darken it. For my Legion, I start by basecoating with my main flesh colour (Rakarth Flesh). The important part here is to keep your paint thinned. Thick, clumpy paint is the easiest way to ruin a face.

Painting Faces Guide

Step 3: I add a wash to darken the recesses (Seraphim Sepia). In this case my wash also adds some warmth to the tone. This is fine for tabletop quality, but when I am painting to a higher standard I prefer to paint everything by hand to avoid wash patchiness.

Painting Faces Guide

Step 4: Highlight with the mid-tone (Rakarth Flesh). Often I see beginner painters skip straight from a wash to a top highlight. This skips out the middle colour and leads to stark highlighting. To get a smoother transition, reapply the mid-tone colour before highlighting the top layer. In this case I leave the dark colour in the recesses around her nose, and in her ears. Remember to keep your layers thin.

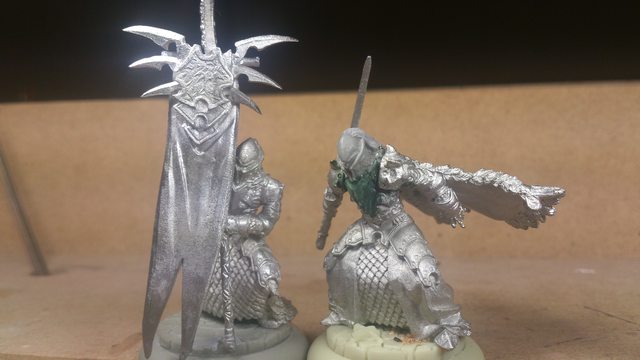
Step 5: At this point I paint the eyes so that if I mess up I can just repaint with my base colour for an easy fix. I paint black into the sockets and then two spots of white on either side of the pupil. Beginners often end up with a wide-eyed look. This is often due to not having a thick enough black line around the eye. The white dots must have black all around them to give the eye depth and avoid that wide-eyed stare. The pic below is of Annyssa after I filled in her sculpted eyes.

Painting Faces Guide

They are tiny! She will look like she is squinting. So I break the first rule of kindergarten and colour outside the lines. This will give us enough black to define her eye and avoid squinting or staring. Girls do this all the time in real life with the magic of eyeliner makeup.

Painting Faces Guide

Step 6: Highlight the raised sections of the face (Rakarth Flesh + White Scar). These sections include the tip of the nose, the cheekbones, chin and browline. Again, keep your paints thin. I use a different painting technique for skin than I do with the other parts of my model. Human brains are wired to recognise faces and so in my opinion, the skin and face are most important parts of the model. If the face is not quite right it can distract the eye from the rest of the model. The technique I use on my skin is called feathering. Coolminiornot has a pretty good description of it here. Basically you put paint on one part of the model and then pull it across the surface so that it gets thinner and thinner and shows more of the underneath layer through. You are effectively concentrating more pigment in some areas than others, as opposed to regular highlighting which involves lighter pigments painted over darker ones. The trick is to get it smooth, and it takes practise and time to get right. I save it for skin, and do quicker techniques on the rest of the model.

Painting Faces Guide

Step 7: Paint her lower lip with a shade of your choosing. I recommend mixing in a little of your flesh colour to tie it together, unless you are deliberately aiming for high contrast (e.g. Sorscha red). Paint a line for her lower lip, but do not paint her upper lip (unless you want her to look like a lady of ill repute). Instead add just two points of paint on the tips of the “cupid’s bow” (the pointy parts of the lip directly under each nostril).

Painting Faces Guide

Step 8: Highlight just the bottom lip with a lighter mix of your lip colour. This adds fullness to the lips.

Step 9: Add eye-colour if you wish. I usually avoid this for my rank-n-file females, because I think the natural look is better for marching off to war. I did however, get carried away on Annyssa. When adding colour to eyelids, I water my paint down and use it as a glaze. It’s runny enough to be a wash, but make sure you don’t have so much paint on your brush that it flows into the crevices to ruin your eyes. Add successive layers of the glaze and let the colour slowly build up.

Painting Faces Guide

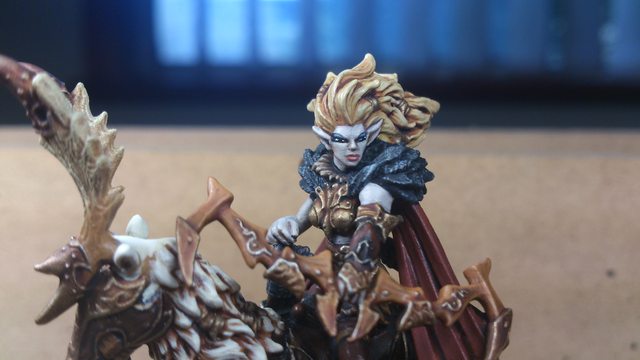
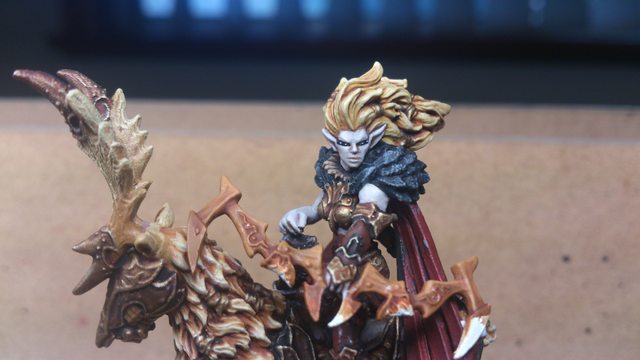
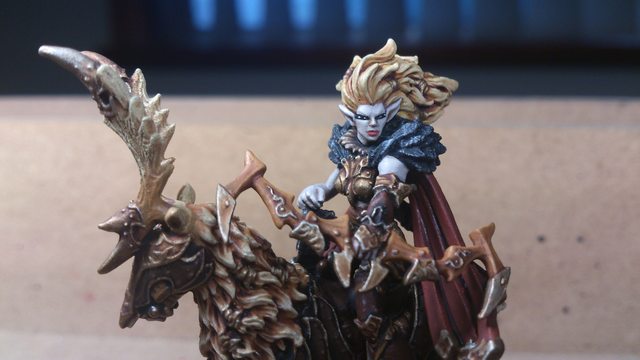
Here is my finished Annyssa Ryvaal.

Annyssa Ryvaal

Thanks for reading, likes/shares/comments are appreciated!

Farilor Conversion

Original upload date: October 26 2013

I never really liked Captain Farilor’s squatting pose and I also wasn’t a fan of his derpy-face, so I sculpted him a new helmet. Unlike my other units, I have duplicate models in my Legionnaire unit because I love the idea that they are so well trained that they fight in unison. It reminds me of the scene at the beginning of The Lords of the Rings movies where the line of elves moves to cut down their opponents in a wave. Wicked cool.

Farilor Conversion

The Captain got a helmet as well as a three-tiered armoured neck collar-thingy. I did keep his hair coming out from the helm instead of feathers. The hair was surprisingly simple to sculpt. Sorry for the glare!

Farilor Conversion

Thanks for reading, likes/shares/comments are appreciated!

Throne of Everblight Conversion: The Portal

Original upload date: October 20 2013

I was playing around with the portal. I decided to texture the top first as it would be more difficult once the tentacles are attached. I hunted around for a picture of a whirlpool and came up with this image to use as a guide:

zpnoy08l

I started applying putty to the top but then had a better idea. Vallejo Water Effects is awesome, it has the consistency of moisturising cream. You spread it across your surface and it dries clear. I decided to make a core shape out of the water effects and paint it up in blues. Then I’ll add a layer of water effects on top mixed with blue so it will be translucent. Finally I’ll add another layer on the very tips and paint it white like froth. This means that most of the whirlpool shape will be added as a later stage after I have assembled and painted the model. Here’s a pic of the water effects just after it was applied (sorry for the night-time shot).

Throne of Everblight Conversion

I originally planned to open up the middle (hence the hole) and have the whirlpool forming a cone shape, but I abandoned that idea. It was tricky to tell how it looked when it was clear so I gave it a dusting of white spray. I’m happy with how it turned out. Once it’s painted I’ll be bulking the waves out to about double their current size, but it’s an organic process. I’m mostly making it up as I go!

Throne of Everblight Conversion

Thanks for reading, likes/shares/comments are appreciated!

Incubi Conversion

Original upload date: October 5 2013 – December 14 2013

The two Incubi on the right are my conversions.

Incubi Conversion

I swapped a spare Legionnaire sword into the kneeling Incubi’s hands. I thought it looked a bit too long so I shortened it into a short sword. The one on the far right is a leftover Spell Martyr torso I had from an earlier conversion (always keep your bits!). I used the original Incubi’s legs, arms and dragon’s head. Here’s a WIP shot with the pins in before greenstuff.

Incubi Conversion

His abdomen had been damaged from the prior conversion so I had to resculpt some abs as well as fill in the arms.

Incubi Conversion

And here they are painted. I experimented with a new technique on these guys. GW had just released a bunch of new “special effects paints” and I’m always keen to try new ideas. This one is called “Blood for the Blood God” and it is a lovely rich red. It goes on with the consistency of paint but depending on how thick you put it on, it shows the underlying colours. It dries with a light sheen, which can become more glossy the thicker you paint it. I preferred to have it thin and semi-transparent. It also has a strange texture to it, not grainy but still it’s not completely smooth.

Incubi Conversion

Thanks for reading, likes/shares/comments are appreciated!

Throne of Everblight Conversion: Sorceress and Platform

Original upload date: October 2 2013

I felt as though the original Sorceress pose was too passive. I used a succubus arm to make it look like she is beckoning the horror down. (I bought a sprue of succy arms the last time my club did a PP order. I think these are a great investment for converting Legion, as hands are especially difficult to sculpt).

Throne of Everblight Conversion

The original throne has claws coming through the top. Since my platform is no longer part-beast I did not add these claws and instead obscured their holes. I then cut the tip off the claws, orientated them upward and stuck them on the corners of the platform. This is to help make my platform look different to the original and fit more closely to my art concept. In his picture I’m in the process of sculpting little bands around the ends of the spikes.

Throne of Everblight Conversion

Thanks for reading, likes/shares/comments are appreciated!

Throne of Everblight Conversion: The Base

Original upload date: September 26 2013 – October 16 2013

I needed to build the conversion from the ground up, so I started with the base. I started by scouring my native hardware/craft stores for cracking paint to match my desert bases. The idea with this stuff if that as it dries it pulls against the previous paint layers, leaving cool cracks in the surface.

After painting a base colour (for the medium to “pull” against) I spread this stuff on thick. The thicker the layer the deeper the cracks.

Throne of Everblight Conversion

After a couple of days drying it looked like this:

Throne of Everblight Conversion

It’s a cool effect, but not the one I was going for. The cracks are all along the outside pointing to the middle and they are cracking into uniform square shapes. This doesn’t match my army at all! I do like the effect, and I’ll keep it in mind if I ever do ice bases.

So back to the drawing board… After a lot of pondering I realise that the natural desert effect is caused by wet clay cracking in the desert sun. So I can try to emulate the effect with my own wet clay. I grab some clay and water and begin to whisk it together into a gluggy soup. It didn’t work very well, I’m not very good at whipping cream, let alone clay! So I did what any sane, rational person would do… and put it in the blender. (Make sure you wash your kitchen appliance thoroughly if you do not wish to end up with a bad case of spousal remorse).

So I poured the clay soup into my base and set it in the sun. It was a lovely 31°C (88°F) Spring day in Sydney so I hoped to get the cracking effect I was after.

Throne of Everblight Conversion

Bummer. Another cool looking effect, but not the one I was after. I decided to try again and begin ripping the clay off the base. It came off in lovely thin chunks and this gave me an idea. I began to glue the chunks back on the base in a random pattern.

Throne of Everblight Conversion

I needed a brass rod to pin the floating disk to the base. It needed to be study as I did not want any pressure from above to bend the wire. Not to worry though, it took the hubby’s entire body weight to bend it to the angle shown. Thanks hubby.

Throne of Everblight Conversion

The bend gives it a greater surface area for the glue, increasing the hold. To make it extra secure I added pins around the brass rod so that it can’t wiggle from side to side and finally some greenstuff to lock it in tight. I was SO happy to see that the platform piece came separate as I was worried I would have to do some severe sawing. I covered up the sockets on the underside of the platform.

Throne of Everblight Conversion

I was having trouble sculpting a rock for the base. I tried clay and greenstuff but I couldn’t get it working right. Cork and bark are great suggestions but I didn’t have any on hand, I did however find something else buried deep in my scenery box.

Rocks! I mean, what better to use as a rock? Right? I used to use shale in scenery projects because it is available where I live, it can be broken into the right size with your bare fingers and it paints up nice. I stopped using the shale a few years ago because it’s quite heavy, but that could actually be a boon for my current project. I glued some shale around the brass rod and filled up the gaps with putty and clay. I also added some bones and other details to the base. I quite like how it turned out!

Throne of Everblight Conversion

I stuck the platform in position. I also cut a circle of thick plasticard to use as my portal. I had a little internal debate on how large to make the portal. On the one hand, a large portal would look more impressive, but it would be nice to fit it in my army box. I also don’t want it to be too top heavy, because all of the weight will be resting on a tiny point. I’ll have to start conservative and enlarge it if needed.

Throne of Everblight Conversion

Thanks for reading, likes/shares/comments are appreciated!

Throne of Everblight Conversion: Planning

Original upload date: September 24 2013

It was at this point that I started planning my most ambitious project to date.

zfeyhrgl

I heard other Legion players talking about how good The Throne is with my (at the time) favourite Warlock, Thagrosh, but I really didn’t like the original model. So during my design stage I made a tally of all the things that I like about the model and the things I hate while keeping in mind Privateer Press’s converting restrictions (must retain weapons, no other manufacturers, etc) and came up with this:

Tentacles: They have to stay as they are the beast’s main weapons.
Sorceress: She’s fine.
Toothy Maw: Gross, but it suits the monster.
Metal Platform: Looks wicked cool.
Weird Tower Shape: Why is it so tall? I don’t like his tubular look.
Icky Brain Matter: Blargh. I don’t like the fleshy folds.

So I wanted a way to get rid of the tall shape and fleshy folds while retaining the tentacles, maw, platform and sorceress. I then realised that one of the reasons that I love the sorceress on the platform is that it reminds me of this:

uqiqgr7l

It’s a Magus from the Warhammer Online game that I tried out years ago, modelled after GW’s Disc of Tzeentch. I love the Spellcaster on hovering disc look, so that’s the direction I decided to take. Now as for the beastie itself, the maw surrounded by tentacles reminds me of this:

w1bxboyl

It’s the Watcher in the Water from the Lord of the Rings. I like the idea of the maw emerging from a pool surrounded by the tentacles. But how will I put these two together? I could have the beast coming out of a pool in the ground while the sorceress floats overhead, but it may look like it’s reaching up to attack her. Then I had another idea:

l8ahfbbl

This is from another game, RIFT, that I tried out when it went free-to-play. I love the idea of a portal opening up overhead and tentacles of an eldritch abomination reaching down…

So my first draft was: “The sorceress will be standing on the top of the Throne platform hovering above the base. Over her head will be a portal from which the tentacles and maw will be emerging downward. There are a couple of issues: the main one is that it will be top heavy so I will have to secure it very strongly to its base. Another is that I’m not sure yet what to make the portal out of. But anyway, that’s what I’m going to try, and no doubt the draft will be revised as I have further ideas.”

Thanks for reading, likes/shares/comments are appreciated!